There are roots poking out of the drainage holes, the plant hasn’t grown in six months despite decent light and regular watering, and the soil dries out within 24 hours of watering. Your houseplant needs repotting. It’s one of those tasks that feels more intimidating than it actually is — you picture yourself knee-deep in compost with a dying monstera and soil all over the kitchen floor. In reality, it takes ten minutes, a slightly bigger pot, and some fresh compost. Here’s how to do it properly.
In This Article
- Signs Your Plant Needs Repotting
- When to Repot
- Choosing the Right Pot
- The Right Soil for Different Plants
- Tools You Need
- Step-by-Step Repotting Guide
- Aftercare: The First Two Weeks
- Common Repotting Mistakes
- Plants That Prefer Being Rootbound
- When to Refresh Soil Without Repotting
- Frequently Asked Questions
Signs Your Plant Needs Repotting
Not every struggling plant needs a bigger pot. Before you reach for the compost bag, check for these specific signs.
Definite Signs
- Roots growing out of drainage holes — the clearest indicator. The root system has outgrown the pot and is searching for more space.
- Roots circling the surface — visible roots on top of the soil mean the root ball has nowhere else to go.
- Water runs straight through — if water pours out the bottom immediately without being absorbed, the pot is more root than soil.
- Plant is top-heavy and tips over — the root system can’t anchor a plant that’s outgrown its container.
- Stunted growth despite good conditions — the plant has light, water, and food but isn’t growing. It’s hit its physical limit.
Possible Signs (Check First)
- Yellowing leaves — could be overwatering, underwatering, or nutrient deficiency rather than pot size
- Wilting between waterings — might just need more frequent watering rather than a bigger pot
- Soil pulling away from pot edges — soil can shrink when it dries out, which is normal in some mixes
The Lift Test
Turn the pot upside down (support the plant with your hand) and gently slide it out. If you see a dense mass of circling roots with little visible soil, it’s time to repot. If there’s still plenty of soil visible between roots, the plant is fine where it is.
When to Repot
Timing matters. Repot at the wrong time and you add stress to an already stressed plant.
Best Time: Spring
Early to mid-spring (March-May in the UK) is ideal. The plant is entering its active growing season and will recover quickly, pushing new roots into the fresh soil within weeks. The Royal Horticultural Society recommends spring as the optimal repotting window for most indoor plants.
Acceptable: Early Summer
June and early July are fine if you missed the spring window. Growth is still active and recovery should be quick.
Avoid: Autumn and Winter
October through February is dormancy for most houseplants. Repotting during this period means the plant sits in damp, fresh soil without actively growing roots — which increases the risk of root rot. The exception is if the plant is in obvious distress (severely rootbound, waterlogged soil, pest infestation in the soil).
Emergency Repotting
If you suspect root rot (mushy, brown roots, foul smell from the soil), repot immediately regardless of season. Removing rotten roots and replacing soggy soil is more important than timing.
Choosing the Right Pot
The pot size matters more than most people realise.
The One-Size-Up Rule
Move to a pot that’s 2-5cm larger in diameter than the current one. Not bigger. A 12cm pot goes into a 14-16cm pot. A 20cm pot goes into a 22-25cm pot.
Going too big is worse than staying too small. In an oversized pot, the excess soil stays wet for too long because there aren’t enough roots to absorb the moisture. This creates the perfect conditions for root rot, which kills more houseplants than underwatering ever has.
Drainage Holes Are Non-Negotiable
Every pot needs drainage holes. No exceptions. Decorative pots without drainage are covers (cache pots) — you put the plant in a functional nursery pot inside the decorative one. Sitting a plant directly in a pot with no drainage is an invitation for root rot.
Pot Material
- Plastic — lightweight, retains moisture longer, cheap. Best for plants that like consistent moisture (ferns, calatheas).
- Terracotta — porous, allows air exchange, dries out faster. Best for plants that prefer drying between waterings (succulents, snake plants, pothos).
- Ceramic (glazed) — similar to plastic for moisture retention but heavier and more decorative. Works for most plants. Check for drainage holes — many glazed pots don’t have them.
- Fabric/smart pots — breathable, excellent drainage, promotes root pruning. Unusual indoors but increasingly popular for larger plants.
The Right Soil for Different Plants
Using the wrong soil is the second most common repotting mistake after choosing the wrong pot size.
Standard Houseplant Compost
Suitable for most tropical houseplants — pothos, philodendrons, peace lilies, spider plants. A good multi-purpose houseplant compost from B&Q, Homebase, or a garden centre works fine. Look for a peat-free option — UK garden retailers have largely moved to peat-free by now.
Cacti and Succulent Mix
Standard compost holds too much moisture for succulents and cacti. Use a dedicated cacti mix or add 30-50% perlite or grit to standard compost. The mix should feel gritty and drain almost instantly when watered.
Orchid Bark Mix
Orchids don’t grow in soil. They need an open, chunky bark mix that allows air around the roots. Buy a pre-mixed orchid compost — don’t try to make one from standard compost, because it’ll suffocate the roots.
Aroid Mix (Monstera, Philodendron, Alocasia)
Aroids like chunky, well-draining soil. A popular home mix: 50% houseplant compost, 25% perlite, 25% orchid bark. This gives the roots air pockets while retaining enough moisture. Pre-mixed aroid soil is available from specialist shops and Amazon UK.
Tools You Need
Nothing fancy. You probably have most of this already.
- Fresh compost — appropriate for your plant type
- New pot — 2-5cm larger than the current one, with drainage holes
- Trowel or large spoon — for scooping compost
- Newspaper or old towel — to catch the mess
- Watering can — for the initial water after repotting
- Optional: crocks or pebbles — to cover large drainage holes (prevents soil washing out)
- Optional: scissors or secateurs — for trimming dead or rotten roots
Step-by-Step Repotting Guide
Lay newspaper or a towel on your work surface. This is going to get messy.
Step 1: Water the Day Before
Water the plant the day before repotting. Moist soil holds together better and slides out of the pot more easily than bone-dry soil. Don’t water immediately before — you want damp, not soggy.
Step 2: Remove from the Old Pot
- Turn the pot sideways and gently squeeze the sides (plastic pots) or run a butter knife around the inside edge (terracotta/ceramic)
- Support the base of the plant with your hand
- Slide the root ball out. If it’s stuck, tap the bottom of the pot firmly
- Never pull the plant out by its stem — you’ll damage it
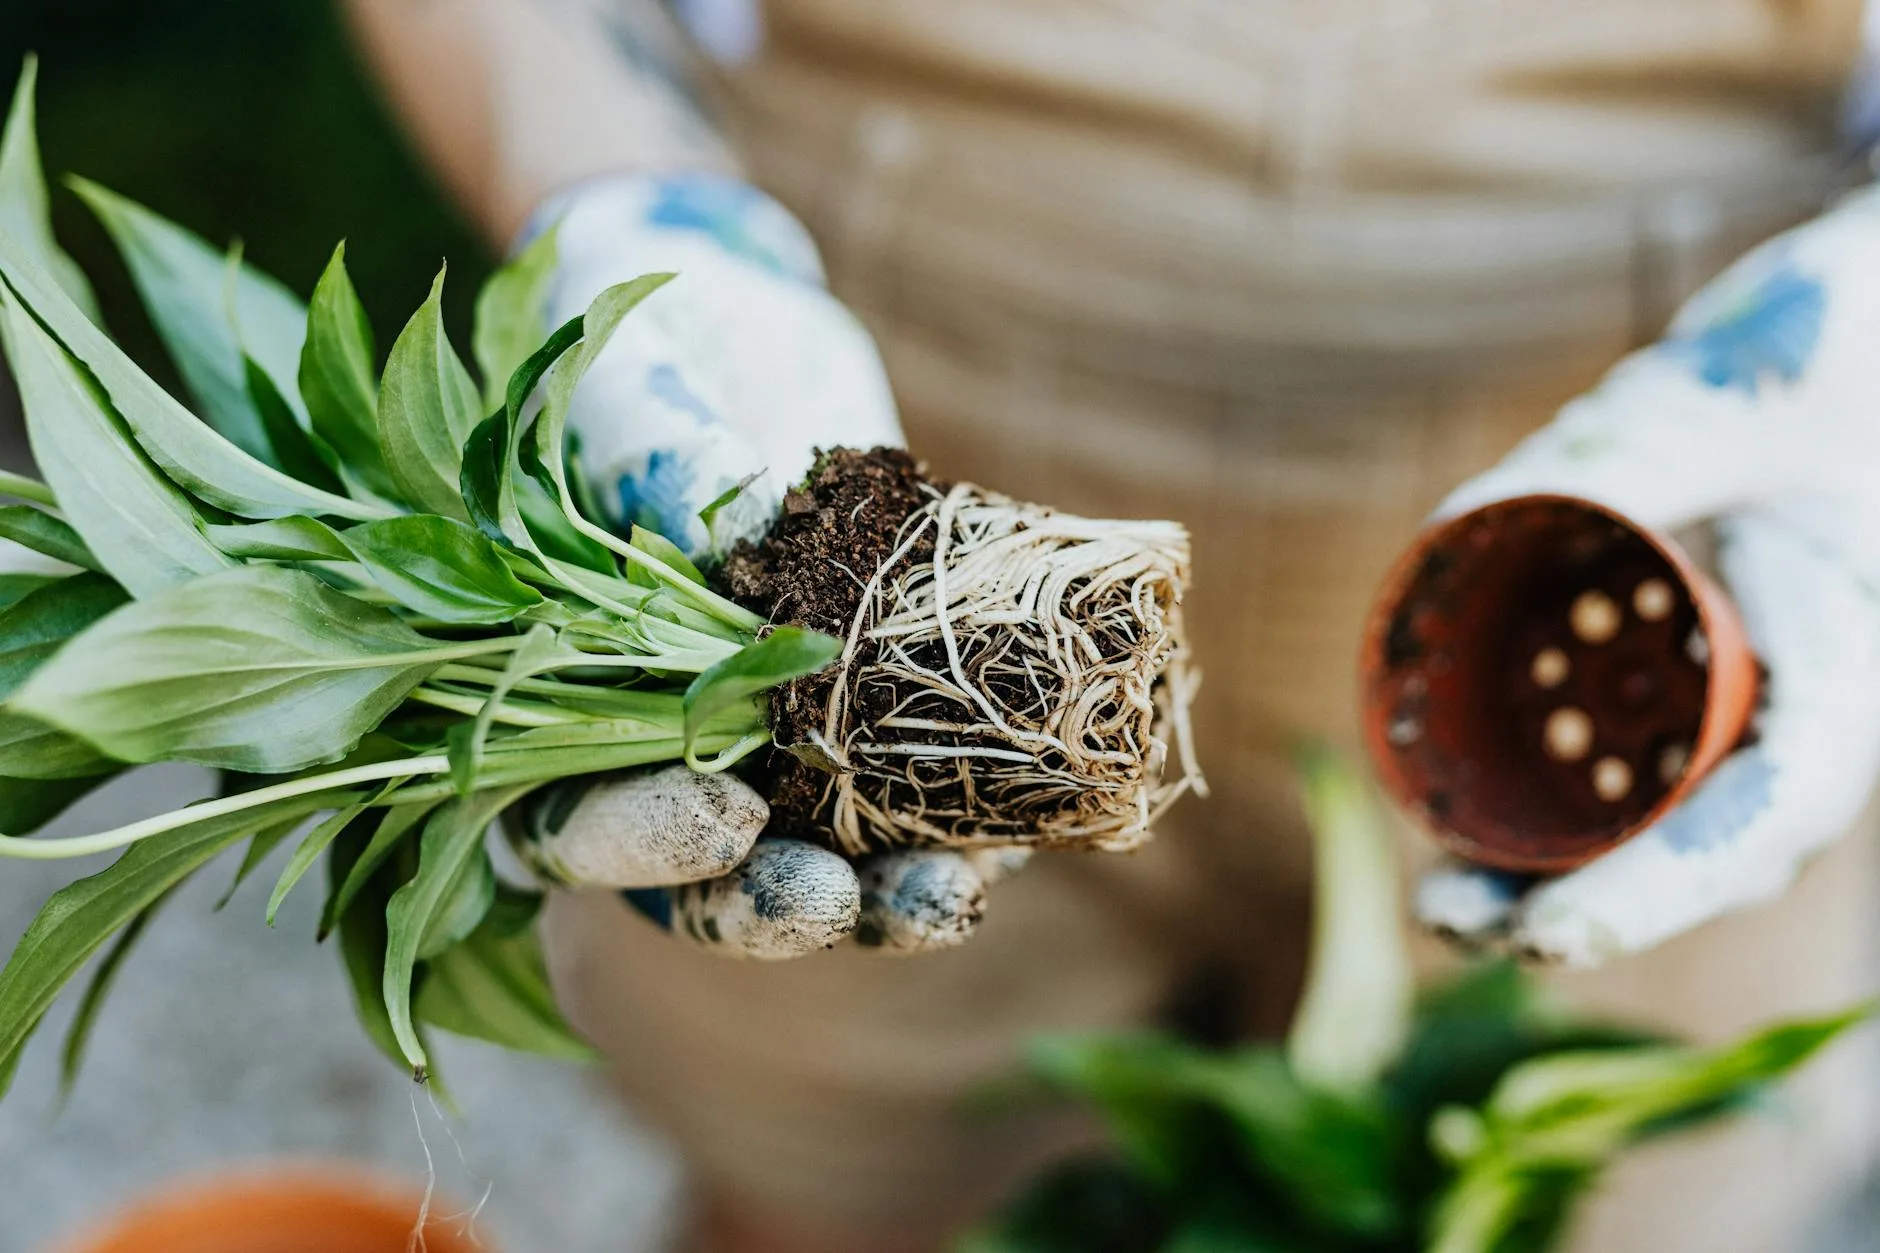
Step 3: Inspect and Tease the Roots
- Gently shake off loose old soil
- If the roots are circling tightly, tease them apart with your fingers. This encourages them to grow outward into the new soil rather than continuing to circle
- Trim any roots that are brown, mushy, or have a bad smell — these are dead or rotting
- Healthy roots are white, cream, or light brown and feel firm
Step 4: Prepare the New Pot
- If the drainage holes are very large, place a piece of broken pot (crock) or a small stone over them to stop soil washing out
- Add a layer of fresh compost to the bottom — enough so the top of the root ball will sit about 2cm below the rim of the new pot
- The plant should sit at the same depth it was in the old pot — don’t bury the stem deeper
Step 5: Position and Fill
- Centre the plant in the new pot
- Fill around the root ball with fresh compost, pressing gently to remove large air pockets
- Leave a 1-2cm gap between the soil surface and the pot rim — this prevents water overflowing when you water
- Don’t pack the soil too tightly — roots need air as well as moisture
Step 6: Water Thoroughly
Water the plant until water runs out the drainage holes. This settles the soil around the roots and eliminates air pockets. Let it drain fully before placing it back in its decorative cover pot or saucer.
Aftercare: The First Two Weeks
Repotting is stressful for plants. Give them time to recover.
What to Expect
- Some wilting — normal for the first 3-5 days. The roots need time to establish in the new soil.
- Dropped leaves — some plants (especially ficus and calathea) drop a few leaves after repotting. Not ideal but not a death sentence.
- No new growth for 2-4 weeks — the plant is focusing energy on root development. Visible growth will follow.
What to Do
- Keep out of direct sunlight for the first week — stressed plants sunburn more easily
- Don’t fertilise for 4-6 weeks — fresh compost contains enough nutrients, and fertiliser can burn newly damaged roots
- Water normally — don’t overcompensate. The new soil retains more moisture than the old, exhausted soil
- Don’t move it repeatedly — pick a spot and leave it there
Common Repotting Mistakes
These are the ones I see (and have made) most often. Our beginner’s guide to caring for indoor plants covers wider care mistakes beyond repotting.
Going Too Big
The most common mistake. Jumping from a 12cm pot to a 20cm pot because “it’ll save time” gives you a plant sitting in cold, wet soil with not enough roots to absorb the moisture. Root rot follows within weeks. Always go one size up.
Repotting a Sick Plant
A yellowing, drooping plant doesn’t automatically need repotting. Diagnose the problem first — it’s probably overwatering, underwatering, or light issues. Repotting adds stress to an already stressed plant. Only repot a sick plant if the soil or roots are the problem.
Burying the Stem
Planting deeper than the original soil line can rot the stem. This is especially deadly for succulents and cacti, where the stem-soil junction needs air circulation.
Not Firming the Soil
Leaving huge air pockets around the roots means roots dry out in some areas and stay too wet in others. Gentle pressing (not compacting) and a thorough watering after repotting solves this.
Fertilising Immediately
Fresh compost has nutrients. Adding fertiliser on top overloads the roots, especially if they’re damaged from being teased apart. Wait 4-6 weeks.
Plants That Prefer Being Rootbound
Not every plant wants more space. Some actually perform better when slightly rootbound.
- Snake plants (Sansevieria) — bloom more readily when rootbound. Repot only when the pot is visibly bulging or cracking.
- Peace lilies — flower more when slightly rootbound. Repot when the plant wilts within a day of watering despite adequate water.
- Spider plants — produce more babies when rootbound. Classic case of “leave it alone.”
- Orchids — prefer tight pots. Repot when the medium breaks down (every 1-2 years), not because the roots fill the pot.
- Succulents and cacti — small pots keep the soil dryer, which suits them. Only repot when they’re visibly unstable or haven’t grown in years.
When to Refresh Soil Without Repotting
Sometimes the plant doesn’t need a bigger pot — it just needs fresh soil.
Top Dressing
For large plants that are already in the biggest practical pot (or too heavy to move), scrape off the top 3-5cm of old soil and replace with fresh compost. This refreshes nutrients and improves water absorption without disturbing the root system. Do this annually in spring.
Soil Refresh
For medium plants that are happy in their current pot size, you can remove the plant, shake off old soil, trim any dead roots, and repot in the same pot with fresh compost. The fresh soil provides renewed nutrients and better structure without increasing pot size.
Frequently Asked Questions
How do I know if my houseplant needs repotting? The clearest signs are roots growing out of drainage holes, roots circling the soil surface, water running straight through without being absorbed, and stunted growth despite good conditions. Do the lift test — if the root ball is mostly roots with little soil, it’s time.
What time of year should I repot houseplants? Spring (March-May) is ideal in the UK. The plant is entering active growth and will recover quickly. Avoid repotting in autumn and winter when most houseplants are dormant, unless it’s an emergency like root rot.
How much bigger should the new pot be? Go 2-5cm larger in diameter. Never skip sizes — a pot that’s too large leaves excess wet soil around the roots, which causes root rot. A 12cm pot goes into a 14-16cm pot.
Should I water immediately after repotting? Yes. Water thoroughly until it drains out the bottom. This settles the fresh soil around the roots and eliminates air pockets. Then water normally going forward — don’t overwater in the following weeks just because the plant was repotted.
Can I repot a plant in winter? Only if necessary — root rot, severely rootbound, or pest-infested soil. Most houseplants are dormant in winter and won’t establish roots in fresh soil as quickly. If you must, keep the plant warm and reduce watering slightly until spring growth resumes.
If you are solving the same room problem, compare this with How to Water Houseplants Correctly, How to Maintain the Right Humidity for Houseplants, Best Grow Lights for Houseplants 2026 UK: LED & Full Spectrum, Low-Light Houseplants That Thrive in UK Homes, Pet-Safe Houseplants: A Complete UK Guide.